Monitoring servers with Beszel and Ansible
Beszel is a simple, lightweight server monitoring with historical data, docker stats, and alerts written in Go.
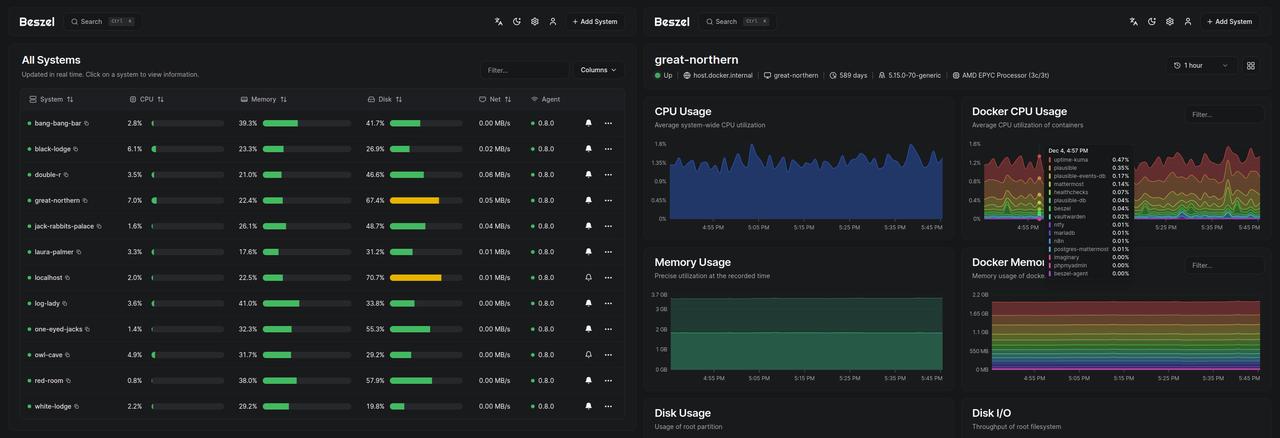
On left, list of monitored systems. On right, page of a system.
It offer the following features:
- CPU usage - Host system and Docker / Podman containers.
- Memory usage - Host system and containers. Includes swap and ZFS ARC.
- Disk usage - Host system. Supports multiple partitions and devices.
- Disk I/O - Host system. Supports multiple partitions and devices.
- Network usage - Host system and containers.
- Load average - Host system.
- Temperature - Host system sensors.
- GPU usage / power draw - Nvidia, AMD, and Intel.
- Battery - Host system battery charge.
- Containers - Status and metrics of all running Docker / Podman containers.
- S.M.A.R.T. - Host system disk health (includes eMMC wear/EOL and Linux mdraid array health via sysfs when available).
Why I choosed it?
I have an homelab, currently composed of 1 RPI (HomeAssistant) and 2 Lenovo ThinkCentre Tiny (Proxmox). Those 3 machines was not monitored since I use them. It’s a long time since I wanted to have a monitoring on my homelab, but didn’t want to dig in Grafana and Prometheus since they are too heavy for my usage.
One day I saw Beszel mention in a mastodon thread, so I got a look on it, and because it is easy to test, I did it.
By running this docker command you’ll run an ephemeral instance of Beszel Hub. And could monitor your computer with docker
too by adding a system from Hub.
docker run --rm -it -e APP_URL=http://localhost:8090 -p 8090:8090 henrygd/beszelIt was not something I was looking for, but Beszel get some info of docker containers. Since I’ve a small docker swarm, it is a good thing too.
Finally, the is a community Ansible Collection to install and maintain Beszel. It was one more argument to use it, for me.
Now let’s have a look of how to install it.
Install Ansible collection
First, we simply need to install the
community.beszel Ansible Collection,
with galaxy or by adding it in the requirements.yml file.
Hub installation
Let’s start by installing the Hub of Beszel.
For that we’ll use mntrng.homelab as FQDN for the hub server and assume that there is a DNS configuration.
Then we simply create a playbook as following:
- name: Install and configure Beszel hub.
hosts: mntrng.homelab
become: true
roles:
- { role: community.beszel.hub, tags: ["beszel", "beszel-hub"] }That’s it. Now we’ll be able to access the hub on http://mntrng.homelab:8090.
On first login, we will be prompted to create our account.
Agent installation
The hub by itself is useless, since there is no data to show. So we need to install the agent on every machines (named systems) we would
like to monitor. For this, we need to use the agent role to install it, like this:
- name: Install and configure a Beszel binary agent with universal token.
hosts: all
become: true
vars_files:
- ../vars/monitoring.yml
roles:
- role: community.beszel.agent
tags: ["beszel", "beszel-agent"]
vars:
agent_public_key: "<Public key for Beszel hub>"
agent_token: "{{ monitoring_beszel_agent_token }}"
agent_hub_url: "http://mntrng.homelab:8090"
# agent_name: "{{ ansible_fqdn }}"For agent_public_key and agent_token variables, there is two ways to get them:
- Using the “Universal token”, and make it permanent, that way the agent may automatically register itselft when it’s a new installation
- Using the “+ Add System”
In my configuration I’ve choose to use “Universal token”, since it’s easier to manage.
The agent_public_key and agent_token are accessible in Settings > Tokens & Fingerprints (/settings/tokens) page, then enable “Universal token”, and choose “Permanent” for “Persistence”.
For agent_public_key we may found it by clicking on the dropdown menu at the right, then “Copy Linux command”, then search for the string who start by ssh-ed25519.
Finnaly, for agent_token we may use the token (UUID) just after the activation toggle.
After ran the playbook, we should see systems appear on the Hub dashboard, and start collecting metrics.
S.M.A.R.T. checks
If you need to check your disks with S.M.A.R.T. tests, then you need to specify for each system you want to monitor, which disks you want to test.
For example:
agent_smart_disks:
- /dev/sda
- /dev/nvme0NVMe devices
Without extra configuration, the agent may not be able to read NVMe disks inforamtion. You have to make the following to have NVMe disk present in Hub data, as documentation tells.
- name: Adjust NVMe device permissions for Beszel agent
hosts: bare_metal
become: true
tasks:
- ansible.builtin.copy:
dest: "/etc/udev/rules.d/99-smartctl-disk-group.rules"
content: |
# Change NVMe devices to disk group ownership for S.M.A.R.T. monitoring for Beszel agent.
KERNEL=="nvme[0-9]*", GROUP="disk", MODE="0660"
notify:
- Reload udev rules
- Trigger udev
handlers:
- name: Reload udev rules
ansible.builtin.command:
cmd: "udevadm control --reload-rules"
- name: Trigger udev
ansible.builtin.command:
cmd: "udevadm trigger"Conclusion
It’s now 3 months since I use Beszel and I’m verry happy of it. It mainly do the job I was looking for. The metrics and alerts are good enough for the use I have we my systems.
There is only some small feature that I miss for now, like having a view to compare all systems at once, to easilly compare CPU or Memory consuptions for example, and tag support.
I also would like to have aggregated logs one day, but with a separate tool.
As I already said Beszel is easy to install, configure and use. For simple usages and small configurations, like homelabs, it feet really well.
Sources: